Machine tool probing increases FMS productivity by 60%
One of Trevisan's longest-standing clients, a multinational provider of valves for the oil and gas sector, invited Trevisan to provide a flexible manufacturing system (FMS) that could produce valves with high precision and productivity, with minimal manual intervention. Trevisan turned to an array of Renishaw machine tool measurement solutions to provide the enhanced levels of process control the system required.

Massimo Marcolin, Commercial Director of Trevisan Macchine Utensili
Background
Founded in 1963, Trevisan Macchine Utensili (Trevisan) located in Italy, is recognised as a global leader in the design and production of stationary-part turning machines. They are used in a variety of industries, including aerospace, agriculture, automotive, energy and marine.
Trevisan has always been characterised by extremely high quality and engineering standards. Its machines are designed and manufactured in-house, ensuring complete control over each step of the production process.
Committed to continuous technological advancement, the company also offers customers complete state-of-the-art FMS solutions, integrating multiple Trevisan machining centres, pallet management systems and automated tool stores.
Challenge
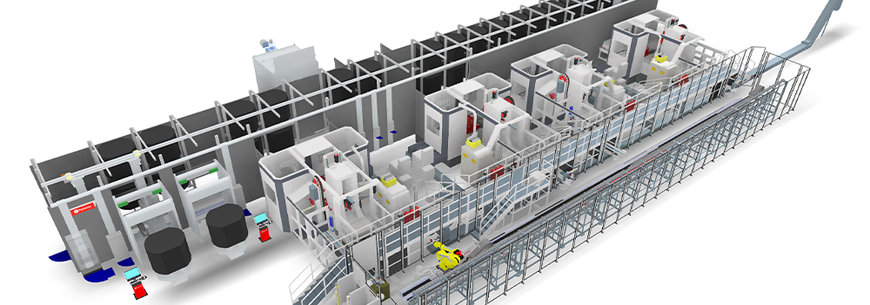
Trevisan's FMS proposal to its client comprised a production line of four of its DS600/200C machining centres, backed by a double-height, 40-place multi-pallet system and a robot-controlled 600-position tool store capable of tackling a range of metals including special steels, stainless steel, alloys and inconel.
Working as the lead contractor, Trevisan engaged with Renishaw for the supply of measurement systems to control and verify parts and tools, as well as other specialist suppliers for the provision of the pallet-handling system and robotics. Trevisan had used Renishaw equipment on its own machine tool production lines for many years, and the valve manufacturer approved of the choice.
For valves used in the international oil and gas sector, the quality of production is paramount. Not only do valves need to ensure the safety of workers, they also need to be relied upon to interrupt oil or gas flows without fail. Perfect tightness is an absolute fundamental requirement for a valve, since even the tiniest of cracks or the minutest of flaws can result in an escape of oil or gas that can pollute and endanger the surrounding environment.
Massimo Marcolin, Sales Director of Trevisan Macchine Utensili said, “To avoid any risk of hazards, valve manufacturing requires maximum precision. For the internal parts of the valve, where flow interception occurs in the core, we cannot allow the slightest inaccuracy. This would render the whole valve unusable.”
Achieving the high levels of accuracy and part quality required presented a series of part and tool measurement and verification challenges:
- Pre-process part verification and set-up: determining the precise position of the raw part on a pallet, its exact dimensions and any stock allowance enables optimised roughing, milling and turning processes.
- In-process part verification: in-cycle measurement of machined features to verify and control performance.
- In-process tool measurement: automated checking of tool health, guarding against tool wear and breakage.
- Finishing tool verification: checking cutting tools for wear or damage prior to final finishing processes.
Marcolin explained, “The FMS is designed such that each valve is processed on a single machining centre, with the aim of producing a valve that's perfectly ready to be fitted and used. This requires that all of the finishing work is completed within the machine and means the finishing tool has to be perfect in its precision.”

Trevisan's Flexible Manufacturing System for valve production
Solution
Inspection probe technology
Each raw part arriving at a machining centre on a pallet is measured automatically on the machine tool using a Renishaw RMP40 radio transmission spindle probe. This ultra-compact touch-trigger probe allows easy access to all part features, enabling repeatable measurement of part dimensions, position and alignment on the pallet within 1 µm accuracy.
The probing system communicates with the machine tool CNC via a Renishaw radio machine interface, RMI-Q. Measurement results are used to align the part and work co-ordinate systems and set-up the machine tool for precision turning, milling and grinding operations.
By using frequency hopping spread spectrum (FHSS) communication, the radio probe overcomes the line-of-site difficulties associated with large multi-task machining centres. Constructed from the highest-grade materials, the probe ensures robust and reliable performance in the harshest environments, tolerating shock, vibration, temperature extremes and constant coolant exposure.
Operating in the recognised 2.4GHz ISM waveband, the probe complies with all international radio regulations. This means multiple radio probes can operate within the same FMS without interfering with one another.
The RMP40 is also employed throughout the valve machining process for dimensional checks on roughed and finished features, to ensure process operations remain in control.
Non-contact tool measurement
With a part's dimensional accuracy dependent on multiple variables, including tool size deviation and run-out. accurate tool measurement and verification throughout the valve manufacturing process is a vital consideration. To achieve the accuracy required, while maintaining fast machining centre throughput, Trevisan elected to use the Renishaw NC4 non-contact laser tool setting system.
Passing a beam of laser light between a transmitter and receiver, the NC4 system is installed inside the machining centre so that cutting tools can be passed through the beam. A tool interrupting the beam causes a reduction in the amount of laser light reaching the receiver, generating a trigger signal. This records the machine position, a process that enables accurate determination of tool dimensions, geometry and any breakage.
Suitable for all types of machining centre, the NC4 system supports a wide range of operating gaps and configurations and features an integral air blast and MicroHole and PassiveSeal technologies to protect its precision optics. It measures and detects tools or features as small as 0.03 µm in diameter and to a repeatability of +/-1 µm.
High-precision tool setting arms
Also part of the FMS' tool set-up operations, Renishaw's high-precision motorised arm (HPMA) was used for in-process tool measurement and broken tool detection on the finishing CNC lathe.
The HPMA comprises a motorised tool setting arm, a RP3 3-axis probe, stylus kit and the TSI3 machine interface (used to communicate with the CNC machine controller).
The arm is available for machine chuck sizes from 6 in to 24 in, with stylus configurations for all standard tooling sizes between 16 mm and 50 mm.

Left to right: RMP40 radio transmission probe, NC4 non-contact laser tool setting system, high-precision motorised arm
For us, it seemed logical to offer our client Renishaw probes and tool setting systems on the FMS as this was what we already knew well and used with great satisfaction. At the same time our client, like us, has also been working with Renishaw for many years and even suggested the use of Renishaw technology themselves.
Trevisan Macchine Utensili (Italy)
Results
By integrating Renishaw machine tool probing systems for the set-up and measurement of valve parts and cutting tools, Trevisan Macchine Utensili has created a flexible manufacturing system for its client that succeeds in maximising precision and productivity.
By automating previously manual operations, the FMS has eliminated both the risk of human error and the risk of scrappage caused by excessive tool wear or tool breakages. Measurements are made with greater accuracy without sacrificing production throughput.

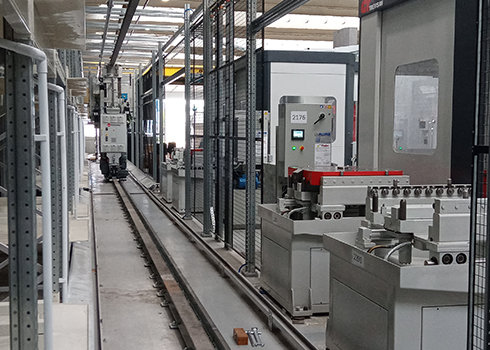
Internal view of Trevisan FMS
Since operating the FMS at full capacity, the valve manufacturer has reported a significant increase in overall productivity of 60% and a defect count of zero. It is producing more high precision valves for the oil and gas sector, more reliably and without any wastage.
www.renishaw.com

